
Last Updated: June 25, 2026
I remember being a young 14 year old kid and just getting excited for an upcoming backpacking trip. I loved the outdoor all growing up, but the idea of getting to spend a whole week outside was thrilling!
But starting out as a backpacker, I had no idea what I was doing.
I made so many mistakes that I can’t even start to count them all. I didn’t know much about gear or even how to use it. What we’ll cover here will help you skip a lot of the same beginner mistakes I made as you’re gearing up for a backpacking trip.
Know Your 4 T’s
Here at Outdoor Vitals, we have something we call the “4 T’s”. These are terrain, temperature, time, and troubles. Knowing your 4 T’s will help you plan your trip effectively and know what gear you’ll need to have with you.
Terrain: You’ll need to know what you’re getting into. What kind of vegetation will there be? Can you set up a hammock between trees? Are there sufficient water sources? You will also want to know things such as elevation and landmarks. This can help you avoid getting lost.
Temperature: Knowing the temperatures forecasted in the area of your trip will help you plan ahead to stay warm/cool. Know the average highs and lows, and potential rain, snow, or plan-altering situations that could occur.
Time: Time is HUGE for planning. If you don’t know how far you can get each day, you might find yourself running out of food well before you reach the end of your backpacking trip. One way to avoid this is to become familiar with your pace, taking into account the type or terrain you’ll be covering. Use your typical speed and distance limits to plan the time and food you’ll need to complete a trip.
Troubles: As you learn more about your upcoming trip, pay attention to details such as whether or not there are bears, or a likelihood for flash-floods or snowstorms. Take into account person-specific ailments like asthma, and bring the correct medications. Be aware of the possibility of heat-stroke or dehydration. You really don’t want to put yourself into an emergency situation. Also know things like if you’ll need a National Park permit, and how much of a budget you have to work with.
Going back to my first real backpacking trip as a 14 year old, we had a guy in our group that had diabetes. We had originally thought that everything would be fine and that we could all go and have a good time. Miles in however, it became obvious that he was not doing so well, and it would not be a good idea for him to keep going for a week.
Conveniently, a commercial horse train came by on the trail heading the opposite direction, and they were able to help take this guy back to the trail-head. But because of certain restrictions and limits they had to abide by, they couldn’t take his pack.
Me and another guy secured our packs in the woods, I grabbed our friend’s pack who had already headed down the mountain, and we determined to carry the pack out and catch up with the rest of the group that night.
Now, this was a great adventure, but exhausting!
I think it could have been avoided had we all known our 4 T’s a little better, including potential health troubles, terrain, and limits. By the time I got to camp I was more than ecstatic to crawl into a tent and sleep!
Speaking of tents, let’s talk about sleep set ups. How do you know whether hammock camping or ground camping is better?
Hammock Camping vs. Ground Camping
Hammocks: Pros and Cons
Pros
- Comfortable
- Easy setup/takedown
- Consistent (you won’t be sleeping on a slope or on rocks, etc.)
- You can set it up during the day to relax on the trail.
Cons
- Can be expensive
- There’s a learning curve involved. (You may want to practice using a hammock system and finding what works best for you before hitting the trail.)
There are a few different types and sizes of hammocks.
A single hammock is a little lighter, and typically aren't big enough for a good diagonal lay. There are some arguments that a straight lay is less comfortable, but we found that if you put a pillow underneath or behind your knees, it helps relieve a lot of tension from the curve of the hammock. If you are a side sleeper, you may find it a little difficult to do a straight lay in a single hammock.
A double hammock is quite a bit bigger typically with a heavier weight limit. They are known for being more comfortable because they allow you to sleep at an angle across the hammock in a diagonal lay. This will allow you to lay flat in the hammock. A drawback to this setup is that you need both an under quilt and a top quilt to use the hammock this way, so there will be more costs for gear.
The reason you can’t just sleep in a hammock with just a regular sleeping bag is insulation. While you lay on a bag and it gets flattened underneath you, the insulation loses its insulating ability. It doesn’t have those little air pockets to separate the cold air outside your bag from you. This is when you’ll get the “cold butt syndrome.” Yep, it’s a real thing.
As an additional note, consider the fabrics that the hammock comes in, along with how much it weighs. Is it 20D, 50D, etc. Suspension systems also need to be taken into account while calculating weight.
Ground Camping: Pros and Cons
Pros
- Trees not needed
- Typically cheaper or budget friendly especially when it’s cold and you need to stay insulated and warm.
- There’s not learning curve involved
Cons
- More heavy
- More setup
- You’ll possibly be sleeping on rocks, slopes, etc.
Now, something that comes along with ground camping is your insulated pad. You’ll likely want one, and need one if it’s going to be cold. Knowing the R-value of a pad can help you understand if it will work well enough for the climate you’re going to be in.
The R-value is the capacity of an insulating material to resist heat flow. The higher the R-value, the greater the insulating power. A quick rule of thumb can help you know what R-value you should be looking for. Between 50 and 60 degrees Fahrenheit, an insulated pad might not be necessary. If the temperature is between 15 and 45 degrees Fahrenheit, you’ll need an insulated pad with an R-value of 4 to 4.5. If you’re looking to be in 0 degree weather, you’ll need an R-value of 5 to 6.
Here’s a recap of that, it’s pretty important:
- 50-60 degrees Fahrenheit: pad may not be needed
- 15-45 degrees Fahrenheit: R-value of 4 to 4.5
- 0 degrees Fahrenheit: R-value of 5 to 6
Another thing to know about pads is what type you want to use. There are mainly three different kinds out there.
- Roll-up/fold-up pads: These pads have good R-value, are really light, but aren’t as comfy.
- Self inflating pads: Although they compact smaller than a roll-up/fold-up pad, they are the heavier of the pad options.
- Air chamber pads: They compress the smallest, are the most comfortable, and are the lightest weight. But they do take longer to set up.
If you are into being “ultralight”, here’s a quick rule of thumb: pads considered to be “lightweight” are 2 lbs or less. Pads that are 1 lb or 1 oz are considered “ultralight”.
Sleeping Bags and Quilts: Insulation Types
As long as we’re talking about pads, let’s also talk about sleeping bags, under quilts, and top quilts and the insulation you can find in them.
Down:
Down has the best weight to warmth ratio as far as insulation goes. However, if it gets wet, it won’t insulate as well. One way to cross this hurdle is to get a treated version of down that has been made to be hydrophobic. At Outdoor Vitals we call this type of treated down StormLoft. You can also treat down yourself by getting something like Nikwax and applying it to your down bag.
Down is rated in fill power. Fill power is how many cubic inches of volume 1 oz. of down takes up. So 800 fill power down means that 1 oz. of down will take up 800 cubic inches. This has nothing to do with the amount of down, rather the quality of the down. The higher the quality and fill power, the smaller your bag will compress.
Important: watch out for “down estimates” or just claimed numbers for down fill power ratings. Some smaller or newer companies do this. Through our own testing, we’ve found many to be way off! Larger companies will usually get their down systems third-party tested, often through IDFL certification.
That’s what we do.
We also try to make sure our materials are RDS sourced, or responsibly sourced. That just means the product or down itself is coming off animals that are being killed for the meat and the down is the by-product. There is no live plucking happening.
Synthetic:
Synthetic insulation typically performs, even if wet. It is also usually cheaper. But it isn’t as lightweight as down. There are a couple different types of synthetic insulation. Steer clear of cotton. If cotton gets wet, it’s basically game over. You’ll get cold, and it won’t dry fast at all. Hollow-filament is usually a polyester type based synthetic. This is definitely preferable over cotton.
With synthetic insulation, denier refers to the thickness of the fibers woven together. With smaller denier, the bag will compress smaller and has more little air pockets to keep you warm.
Both down filled and synthetic filled bags are typically rated at lower comfort ratings on the EN scale. If you buy a bag rated for 30 degrees, you probably won’t actually want to take it below 35 or even 40 degrees to be truly comfortable. You want use the bag in 5 to 10 degrees warmer weather than what its rating is.
Some companies rate bags with survival ratings, so in that case you would want to add even more degrees to the rating to be accurate, but survival ratings aren’t industry standard.
I’ve made the mistake more than once in my outings just thinking that I would be able to take a 0 degree bag down to 0 degrees. I promise it is not a great experience to wake up all the time throughout the night just freezing!
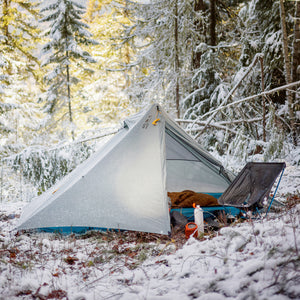
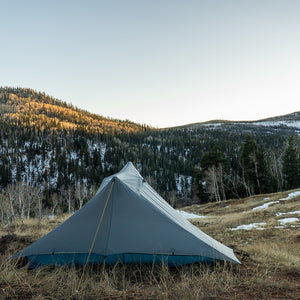
Shelter Systems
Another important aspect of camping and backpacking is your shelter system. Do you want to use a full tent? What other options are there? Some shelter systems work better in certain situations than others. Hopefully this next section can help you make an informed decision on what will work best for you.
Tents: There are freestanding tents, which don’t require stakes in the ground to stay upright and are easier to clean out, and there are non-freestanding tents. They have fewer poles, less weight, but need stakes to stand. There’s a lot of great things about using a tent. They usually have bugnets built in, bathtub floors, a rainfly, are well vented, and are modular. They also have more head room. But all these features come at the cost of weight. You’ll have to be packing all that around.
In the tent industry, it’s common for tents to be rated for about one person bigger than they actually are. So if you get a 3 person tent, it’ll work better for 2 people in reality. The exception is with 1 person tents. A 1 person tent will always still fit 1 person in it, there just won’t be a lot of extra space.
Knowing the different types of tent poles can also help with decision making. There are fiberglass, aluminum, and carbon fiber tent poles. Fiberglass is getting outdated. They are bigger, heavier, and break and splinter easier. Aluminum poles are lightweight and sturdy. They won’t splinter if they break. Carbon fiber poles are kind of rare and expensive, but they are even stronger and lighter than aluminum.
Teepees: Teepees are lighter than tents. They only sometimes have floors. There is also less head room than in tents.
Tarps: One great thing about tarps is that they are customizable. You can throw them up basically anywhere. You can tie them up between trees, using hiking poles to prop it up, or even some combo of both! Tarps can also be set up as a windblock. They are also ultralight. One con is that there is no floor.
Bivys: Using a bivy is great with a tarp, but not so much on its own. They don’t have a lot of room in there. Make sure and check for breathability in a bivy. If it’s not breathable and you sweat at all, that moisture can get trapped and you can get pretty cold!
Backpacks
Now I guess it would be important to go over the method of carrying all this gear around. The backpack. It’s basically your portable home carrying device while you’re out in the woods. There are three types of backpacks I’d like to cover: the non-frame, the internal frame, and the external frame.
- Non-frame backpacks: These packs are truly ultralight. They are good for day trips since they are the smallest and lightest type of pack. But they are less comfortable without a frame, and probably not the best option for carrying a lot of weight.
- Internal frame backpacks: With the capacity to carry up to 40 lbs, these are a pretty reliable type of pack. Photographer and hunter packs can carry extremely heavy loads. Internal frame backpacks are the most comfortable, breathable, and flexible of the packs. Like I said, they are great for heavy loads. They are fairly light, but not as light as the non-frame packs
- External frame backpacks: External frame packs are kind of left in the past. One bonus is that you can easily tie gear to the outside of the pack. They are durable and cheap, but also large, bulky, and heavy.
How big of a pack do I need?
Depends on the outings and trips you go on! If you are a true ultralight backpacker or just going on day trips, you could use a 40L or under pack. If not, you probably would like somewhere between a 40L to 60L pack. (2400 cubic inch to 3700 cubic inch mark). If you’re a true ultralighter, you could use a 40L pack for 3 days to a week to carry food and gear before having to restock.
We don’t really recommend a pack bigger than 60L. If it’s any bigger, you won’t really want to use it for any day trips or anything. Kind of find your sweet spot. Also take into consideration how you like to organize things and use the different pockets and the space you’ll need to do so.
Make sure your pack can compress when nothing is inside of the pack, you don’t want loose fabric flapping around when the pack isn’t completely filled up.
Durability is key. Out of all your gear, you’ll probably replace your backpack most often. Everything else is tucked safely inside of the pack while your pack is taking all the wear from being used and bumped around, etc. Lots of thicker and stronger fabrics will weigh more, but the durability will help you keep the pack longer. Just something to consider when looking for a backpack.
Backpack weights:
Light Weight: 3-5lbs
Ultralight: under 3lbs
*Photographer/Hunter +1 to either of these
Food on the Trail
If you only remember one thing, remember this: calories per ounce. You want the most calories per ounce you can get to make sure you have energy on the trail and are not packing a lot of extra weight (which will just use up your energy faster). Here are some goals to shoot for:
- Try to bring foods that give you at least 120 calories for every ounce of weight. That converts into about 30 grams to 1 ounce of food.
- Go for foods high in fat rather than sugars. Fats will stay with you longers.
- Shoot for 3000-4000 calories per day. You’ll still burn more than you consume due to the nature of walking around in the wilderness with a heavy pack on your back, but you need to do your best to keep that calorie count up so you have energy.
To help clarify, how about some examples of foods that meet these requirements? There are a few different directions you can go with this.
- Mountain House: There are a ton of different meal options with Mountain House. They have a lot of calories per ounce and are made specifically for backpacking. But it’s probably wise to only eat one Mountain House meal per day because they’ve got a lot of sodium. If you have too much sodium, you could experience some swelling. Mountain House is also a bit expensive.
- Another meal option would be to get instant mashed potatoes. Also a great calorie per ounce ratio.
- Knoll’s rice meal packages are good.
- Frito’s are actually also a good option, believe it or not! They are high in fat, so that brings the calories per ounce level up and they’re also a great snack!
- Reeses are good for much the same reason as Frito’s. Reeses are higher in fat than lots of candy bars instead of just being high in sugar.
- Clif bars have about 110 calories per ounce. Be careful about some of the cheaper bars out there, some of them actually have a very low amount of calories per ounce.
- Trail mix has about 160 calories per ounce! Classic and delicious and way effective.
- Individually packaged cheese sticks are a good option for getting dairy. The dairy product can help coat your stomach and keep things running smoothly.
- Dried bananas are about 150 calories per ounce.
- Breakfast biscuits by Nature Valley are pretty good and have a good calorie per ounce ratio.
- Gatorade or Propel drink mixes are also helpful, not so much for the calorie per ounce factor, but more to replace electrolytes and minerals that your body loses as you sweat and work. You can also bring some nice Himalayan salt to mix with the Propel mix to increase your mineral and electrolyte intake if you are worried about running low on them.
Tip: Use gallon ziplock bags to separate your food for each day. You can use smaller ziplock bags to organize meals for the day within that gallon bag. That way it’s easy to ration out your food, just use one gallon bag per day!
Another thing to think about is your cook system. You can find a pretty nice rocket stove for $10 on Amazon. Pick up some pots and pans for another $10 or so from Walmart, Amazon, or a sporting goods store and you’ll be in good shape! You could also get a Jetboil, but this is a more expensive alternative, and may not be necessary if you’re just starting out.
Getting a good water purification system is also important. Sawyer has some good filters, a simple one would cost probably around $20. Again, this will work fine especially if you are just starting out. Another option is getting a Lifestraw.
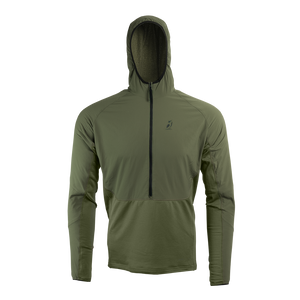
Clothing on the Trail
So what should you wear? Right at the start I want to make sure we’re clear on one phrase, “cotton kills.” Cotton doesn’t dry, and you get cold easily with it. Hiking in jeans or a cotton shirt is frowned upon. Spandex is also something to avoid if you can. I know it looks all athletic and awesome, but it holds on to water as well. Try to get a lower percentage of Spandex in clothing.
What you do want is something like wool. Wool is hydrophobic and will dry way fast. It’s also odor resistant, so you don’t have to worry about washing it as often on the trail in order not to completely reek. There are wool shirts, socks, and I think even underwear. I don’t think there are wool pairs of pants, but a good alternative is polyester or nylon synthetic clothing. Those alternatives are good for other articles of clothing besides pants as well if wool is not an option. Wool tends to be a little more expensive, but is worth it! While shopping for clothing, look at what percentage wool a specific garment is made of. Usually 70% or higher is recommended for the results I’ve mentioned.
As far as footwear goes, get as lightweight boots as you possibly can. Having heavy boots just affects the whole backpacking experience, and at the end of the day makes the backpack feel pounds heavier. You’ll be on your feet a lot, so this is important. A great alternative lots of people are getting into is trail running shoes. These are light and really breathable.
Miscellaneous
Just a few other things to consider bringing on a backpacking trip:
- Headlamp with extra batteries: light is obviously incredible useful.
- Cell phone: the GPS on a smart-phone does not require cell service to function. Having maps available is awesome. Bring a battery backup for your cell phone.
- Duck tape: this can help with First Aid splints, and a number of other things.
- Dyneema Cord: it has a whole variety of uses, including in emergencies. One use is tying food up in a tree out of the way of bears.
- Water purification or filter system: must have. The last thing you want is to run out of water.
- Sunscreen or protective hat and long-sleeve shirt
- Toilet paper: it’s a lot better than using leaves. You can also bring wet wipes. Wet wipes have a dual purpose since you can also use them to bathe yourself and get feeling a bit more refreshed.
Conclusion
If you follow these suggestions and guidelines, I think you’ll find your backpacking experience to be a lot more enjoyable than otherwise! There’s plenty of room to find your own individualized style for backpacking, but some things you just won’t want to ignore.
Happy Trails!
More stories

Comments
Thank you for this informative article. I appreciate all of the details about important aspects of backpacking. I am a true beginner so I feel much more confident that I will be better prepared if I follow these guidelines.
Just got done reading a most interesting article. I have to tell you guys over there at outdoorvitals have really upped my game and my confidence that I can and will make this AT thru hike a journey to remember…
This is an awesome article for beginners etc… I’m from Michigan, trying snowshoeing this year and getting more involved with bikepacking next year using Outdoor Vital equipment. Can’t wait to try the new gear that just arrived… keep up the awesome work!!! (Can’t wait for the jackets to come out as well)….
Thanks for the good information here. I appreciate your explanation of “fill power” and the specifics regarding different pieces of gear being light, ultralight, etc. It’s good to know my (really) old Eagle Creek 60 liter pack (give or take a liter or two) is considered “light.” ! Thanks again.